Tuesday, February 26, 2013

Export to excel Link ...


Today I ran into a scenario where requirement was to NOT use the ribbon to export the list to excel but access it via the left navigation.

After some research I could find a way to do this:

http://[Server]/[Site]/([Subsite]/)_vti_bin/owssvr.dll?CS=109&Using=_layouts/query.iqy&List=[ListGUID]&View=[ViewGUID]&CacheControl=1

Replace the [Placeholders] with your specific values.

One way to get the list and view GUIDs is to go into "List settings" then scroll down to the views section and click on the view that you want to use.

Here is an example:
http://development004:100/_layouts/ViewEdit.aspx?List=%7B9B8241B3%2D7F09%2D4F45%2DBEE3%2D755E3F7C3FE4%7D&View=%7B70A055C3%2DAEAD%2D4006%2DAB79%2D93D3E700EEC4%7D

Breaking the above :

List=%7B9B8241B3%2D7F09%2D4F45%2DBEE3%2D755E3F7C3FE4%7D

View=%7B70A055C3%2DAEAD%2D4006%2DAB79%2D93D3E700EEC4%7D


Another Tip :
If you are getting the error displaying the list in Data sheet view download and install
http://www.microsoft.com/en-us/download/details.aspx?id=23734

Monday, February 25, 2013

Custom Site Provisioning - SP2013 way....

Before I move on to the  content for my blog today .. here's some importnant information..SP2013 preview is ending soon to give way to the live version of SP2013 on the cloud ( o365)
 
O365 launch event info below. Please Sign up to see the new stuff.

Virtual Launch Event on February 27th 2013 as Microsoft celebrates the availability of a major new release coming to Office 365 for businesses.  Demo of new features in enterprise social and show how this has transformed the full Office experience you know into an always up-to-date service. Some real-world stories from customers about their move to the cloud. 
 
Now coming back to code....
 
Recently I had a requirement to do some feasibility study for SP2013 for sandboxed solutions. Well as we all know Microsoft has deprecated sandboxed solutions in o365 2013
This means that the functionality will still be available for use in SharePoint 2013, but primarily for backwards compatibility with existing solutions built using the sandbox solution approach.
 
Microsoft's guidance is that if you are building new applications that in the past you would have deployed as sandbox solutions, you should use the new App model for those solutions instead of using sandbox solutions.
 
More info on an article here...
 
Some SharePoint components are used in end-user scenarios but do not have any equivalents in the SharePoint app model. For these you must use farm solutions.

Well the requirement in this case is to "Create a custom user interface to provision a sub site based off a custom template, add some details to the site and add users"

Well - I plan to try this as an app too.. but from the looks of it if I want to create a custom web Template this is not supported. Hence, my first reaction is to create a Sandbox solution.

Upload a custom SP 2013 Site template in the solutions gallery!


CODE :
 using System;  
 using System.ComponentModel;  
 using System.Web.UI;  
 using System.Web.UI.WebControls;  
 using System.Web.UI.WebControls.WebParts;  
 using Microsoft.SharePoint;  
 using Microsoft.SharePoint.WebControls;  
 using Microsoft.SharePoint.Client;  
 using System.Collections.Generic;  
 using Microsoft.SharePoint.Navigation;  
 namespace SharePointProject1.CreateSubSite  
 {  
   [ToolboxItem(false)]  
   public partial class CreateSubSite : System.Web.UI.WebControls.WebParts.WebPart  
   {  
     string AccountGroup = "";  
     protected override void OnInit(EventArgs e)  
     {  
       base.OnInit(e);  
       InitializeControl();  
     }  
     protected void Page_Load(object sender, EventArgs e)  
     {  
       AccountGroup = txturl.Text + " Account Group - Contributor";  
       // Create more gropups based on requirements  
     }  
     protected string GetCustomTemplate(SPWeb web)  
     {  
       SPWebTemplate SiteTemplate = null;  
       // Find correct template  
       foreach (SPWebTemplate wt in web.GetAvailableWebTemplates((uint)1033)) // for EN-US use LCID 1033, http://msdn.microsoft.com/en-us/goglobal/bb964664  
       {  
         if (wt.Title == "AccountSiteTemplate")  
         {  
           SiteTemplate = wt;  
           break;  
         }  
       }  
       return SiteTemplate.Title;  
     }  
     protected SPWebTemplate GetCustomSiteTemplate(SPWeb web)  
     {  
       SPWebTemplate SiteTemplate = null;  
       // Find correct template  
       foreach (SPWebTemplate wt in web.GetAvailableWebTemplates((uint)1033))  
       {  
         if (wt.Title == "AccountSiteTemplate")  
         {  
           SiteTemplate = wt;  
           break;  
         }  
       }  
       return SiteTemplate;  
     }  
     private void CreateSPGroup(SPWeb newWeb)  
     {  
      //  AccountGroup = txturl.Text + " Account Group - Contributor";  
       SPGroup groupContributor = newWeb.SiteGroups[AccountGroup];  
       SPRoleDefinition roleDefinitionContributor = newWeb.RoleDefinitions.GetByType(SPRoleType.Contributor);  
       SPRoleAssignment roleAssigmentContributor = new SPRoleAssignment(groupContributor);  
       roleAssigmentContributor.RoleDefinitionBindings.Add(roleDefinitionContributor);  
       newWeb.RoleAssignments.Add(roleAssigmentContributor);  
       lblStatus.Text += "</br>Subsite Groups successfully created!!</br> ";  
     }  
     private void AddUsersToGroups(SPWeb newWeb)  
     {  
      //  AccountGroup = txturl.Text + " Account Group - Contributor";  
       SPUser spUser = newWeb.EnsureUser(txtContributor.Text);  
       if (spUser != null)  
       {  
         SPGroup spGroup = newWeb.Groups[AccountGroup];  
         if (spGroup != null)  
           spGroup.AddUser(spUser);  
       }  
       txtSiteDesc.Text = "";  
       txtSiteName.Text = "";  
       txturl.Text = "";  
       lblStatus.Text += "</br>User Successfully added to the group! ";  
       lblStatus.ForeColor = System.Drawing.Color.Green;  
     }  
     protected void Button1_Click(object sender, EventArgs e)  
     {  
       using (SPSite site = new SPSite(SPContext.Current.Web.Url))  
       {  
         using (SPWeb web = site.OpenWeb())  
         {  
           if (string.IsNullOrEmpty(txturl.Text))  
             txturl.Text = "Demo";  
            if (string.IsNullOrEmpty(txtSiteName.Text))  
             txtSiteName.Text = "Demo";  
            try  
            {  
              web.AllowUnsafeUpdates = true;  
              web.SiteGroups.Add(AccountGroup, web.CurrentUser, web.CurrentUser, string.Empty);  
              SPWeb newWeb = site.AllWebs.Add(txturl.Text, txtSiteName.Text, txtSiteDesc.Text, 1033, GetCustomSiteTemplate(web), true, false);  
              newWeb.Description = " New Account site created!!";  
              lblStatus.Text = "Subsite successfully created!! " + "<a href ='" + newWeb.Url.ToString() + "'> New Subsite Link </a> ";  
              CreateSPGroup(newWeb);  
              AddUsersToGroups(newWeb);  
              newWeb.Dispose();  
              web.Dispose();  
            }  
            catch (Exception ex)  
            {  
              lblStatus.Text = "Exception Occured! Error message : " + ex.Message.ToString();  
              lblStatus.ForeColor = System.Drawing.Color.Red;  
            }  
           finally  
           {  
             web.AllowUnsafeUpdates = false;  
           }  
         }  
       }  
     }  
     protected void txtTemplate_Click(object sender, EventArgs e)  
     {  
       using (SPSite site = new SPSite(SPContext.Current.Web.Url))  
       {  
         using (SPWeb web = site.OpenWeb())  
         {  
           txtSubsiteTemplate.Text = GetCustomTemplate(web);  
         }  
       }  
     }  
   }  
 }  


Upload the sandbox soultion to the solutions gallery


Add the web part top a page and start provisioning sites your way in SP2013...!!

Note:
In case you are thinking about the cool User Interface... This is because I have chosen a Theme - Orbit.. This is super simple and easy...
Please go through my blog to see how this can be done!


Thursday, February 7, 2013

My First NAPA App - o365 SP2013 Preview

What is NAPA ???

 
NAPA is the easiest way to start building apps for the new Cloud App Model introduced in SP2013. You can think of it as a super simple development environment with no installations on the local machines & an online companion to Visual Studio. This is a free app for SharePoint to facilitate rapid application development.

App Model - what is it?

Within the last decade the Internet has evolved tremendously from simple pages to robust social sites that support loosely coupled yet highly integrated third party apps. From the beginning of SharePoint to today, SharePoint has also made significant changes from being a portal site to our newest release. SharePoint 2013.
 
For the developer and ultimately benefiting the user, SharePoint 2013 has made a significant investments to provide a new way to bring custom solutions to users with the new web standards based cloud app model that are easily discoverable and yet will give IT and developers peace of mind knowing that they can scale, are safely isolated from SharePoint yet can leverage the full capabilities of SharePoint.
 
 
One of the new features of SharePoint 2013 development model is the App model. Using this new App model, developers can easily extend SharePoint 2013 and build great apps that integrate with the numerous services. Today web is filled with many services i.e.
Financial data, WikiPedia, Bing Search and Maps etc.  Even SharePoint, Dynamics CRM can provide data for us. This model make it easy for developers to integrate these services into SharePoint for consumption and build solutions that solves specific user needs.

Apps enable SharePoint 2013 users to extend the capabilities of SharePoint 2013 to address specific business needs by allowing users to connect to data and services both from within an organization as well as in the public cloud.

How is it different that what was offered before in SP2010?

The new cloud app model gives the developer the freedom of choice in how they implement apps for SharePoint. No longer are you tied to writing on top of the SharePoint platform, now you can write along-side it with the tools and web hosting platforms of your choice… Whether it is on premise or in the cloud… Whether the platform is IIS/ASP.NET, a part of the Windows Azure family of hosting options or a non-Microsoft web hosting platform.  The final choice is up to you.
 
 
Now we have had WebParts and the like for SharePoint for some time and we can provide similar experiences creating full-trust and sandbox solutions.  The issue is that these apps are tightly integrated with the platform and require some amount of touch to insure as technology advances that our customizations can advance with it.  This is were apps differ, apps are loosely coupled and not dependent on the SharePoint as a platform, but dependent on SharePoint as a service. Apps execute “off-server”, hence they don’t actually run on the SharePoint box but instead are hosted in their own hosting environment which could be the browser, a Window Azure service, ASP.NET or even a non-Microsoft web hosting platform such as Linux or Amazon Web Services.

 
 Life cycle for app for SharePoint development :


Developement - Let's build our very first Napa App on the cloud:

Create a new SP2013 preview account by following the instructions here
 
The Team site that is provisioned by default, Let's try to add NAPA app.


You will see that it does not get added. Don't panic yet,  Go to see the details of the error.
 
So we need a site with a developer template / developer features turned on. Hence I go ahead and create a new developer Site. 


And YAY it gets added !!


Now, Let's create a new Project:


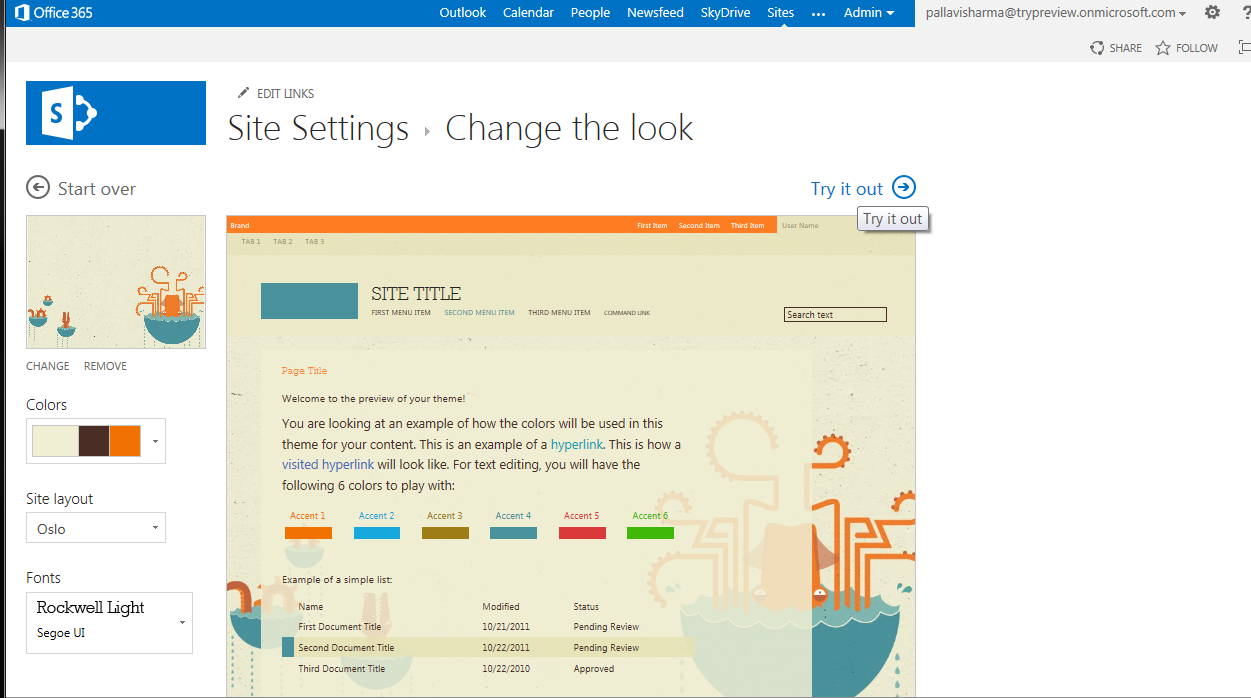
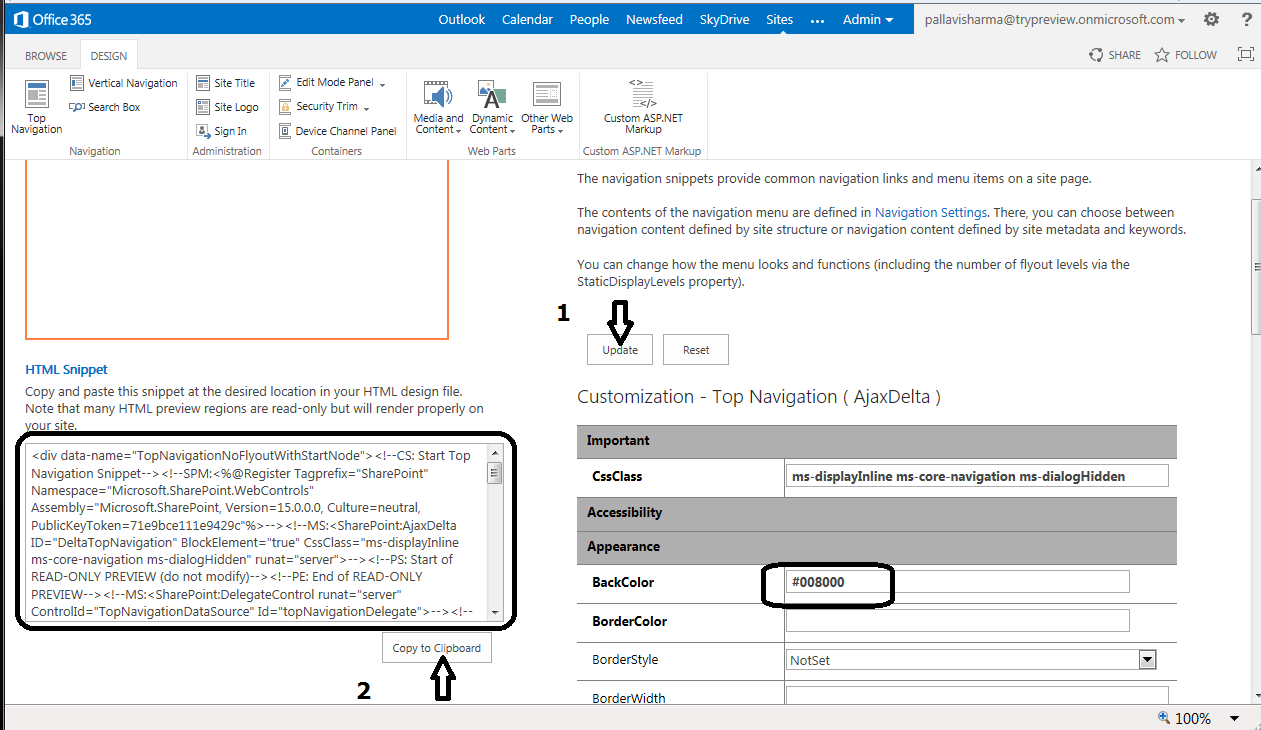
Some changes that we need to do in the Default.aspx


And Now changes to App.js file

To Change the look and feel of the site changes can be done to our App.css

The O/P looks as below:


I added the code for an embedded Bing map


 <p>A simple embedded map.</p>  
    <iframe width="400" height="300" frameborder="0" scrolling="no" marginheight="0" marginwidth="0"  
      src="http://dev.virtualearth.net/embeddedMap/v1/silverlight/aerial?zoomLevel=10&center=47.5_-122.5&pushpins=47.5_-122.5"/>  

 
The app is ready for testing and starts appearing in your gallery


A couple of items that I tried to add to my NAPA app are below for reference using JavaScript Client Object Model

1. Add a People picker to your page:

 Changes to the App.js file

 
Changes to the default.aspx file  

2. Add a Embedded Bing Search to your page:

Add the below to Deafult.aspx


Important links for reference

MSDN  

Monday, February 4, 2013

o365 - SP2013 Preview Branding....

Recently I tried my hands on branding SP2013 preview site and wanted to share this with the community. SP2013 has vastly reduced the overhead that we had in SP2010 for branding by giving us the flexibility of using the HTML editor of your own choice rather than SP designer. Today we will focus on some of the different ways you can achieve branding in SP2013.

To start with I had to go ahead and create a SP2013 preview account, this is easy to get started with for a free trial. I have blogged about how a  trial preview account can be set up earlier. click here to learn more..

Create a site based off publishing site template and here's how the provisioned site looks..

 
Design Manager :

SP2013 has a new feature called as the Design Manager : In SharePoint 2013, Design Manager can help web developers and designers build and export the visual design of a SharePoint site collection as a package. This package can easily be distributed to customers, or other designated groups, for installation on their site collections. This new feature reduces the complexity of transporting designs, and makes it easier for customers to outsource the visual design of their sites. To access the design manager go to site settings ..


This will give you a list of links on left navigation and in this blog we will go though a simple process of changing the master page using some of the left navigation links of the Design Manager.
 
A quick and easy way to change the look of your site if you like what you see in the preview.


Custom Master (HTML) :
 
If you have not happy with what you get in the out of the box options of changing the look and feel there are options to also modify that or create your own custom master page.
 
Create a new minimal Master to start with an empty canvas and start adding your functional branding components via the HTML snippet tool.
 
Very important note : As long as the master page and the HTML file are associated you will only be allowed to change the HTML and not the master.


Insert Snippet:

Click on the Snippet link. This will redirect you to a snippet tool editor which is customized based on whether you are creating snippets for a master page or a page layout.

Click the Top Navigation button in the ribbon.This will create the HTML snippet you need.You can customize the properties of the top navigation control and click on “Update” to generate the new snippet. Now  copy the HTML snippet to the clipboard and paste it in the right location in the HTML file. Save and Publish the HTML file.


Explore your Branding elements files via the Explorer :
 
You can also map your local drive to the online account and use any HTML editor of you choice to edit your branding assets. This gives great flexibility to the end user for designing.


SharePoint Designer 2013 Preview :
 
Download SPdesigner 2013 from here if you are still hooked to the Designer as I am. Old habits die hard.......


Publish the master files


Specify Css and Script files if any in the master page

 <link href="_catalogs/masterpage/Custom/Custom.css" rel="stylesheet" type="text/css" />  


Site settings : Master Page -

Set the new master page as your custom master page.


New look and feel...........


The html file and the master page are associated with each other and SharePoint does not allow you to delete the master page or even publish it as long the association is still there.If you wish to remove the association, go to the master page gallery.

   1.Select the Html file
   2.Edit Properties
   3.Uncheck the “Associated File” check box.
   4.Save


You could also build the master page per the specifications and then, disassociate the html file, package the master page in a wsp and then deploy it to your various environments.
      Or
Use the design manager to create a design Package which can be imported across
environments. This is what I will be exploring more in my next blog.